The hotspot captive portal
The group of pages that are displayed to the customer during login, registration via SMS, prepaid ticket purchase, etc. are called the Captive Portal.
You can set several captive portals in My Wi-Fi Service so that each location has a different aspect and different functions than the others.
Captive portal aspect
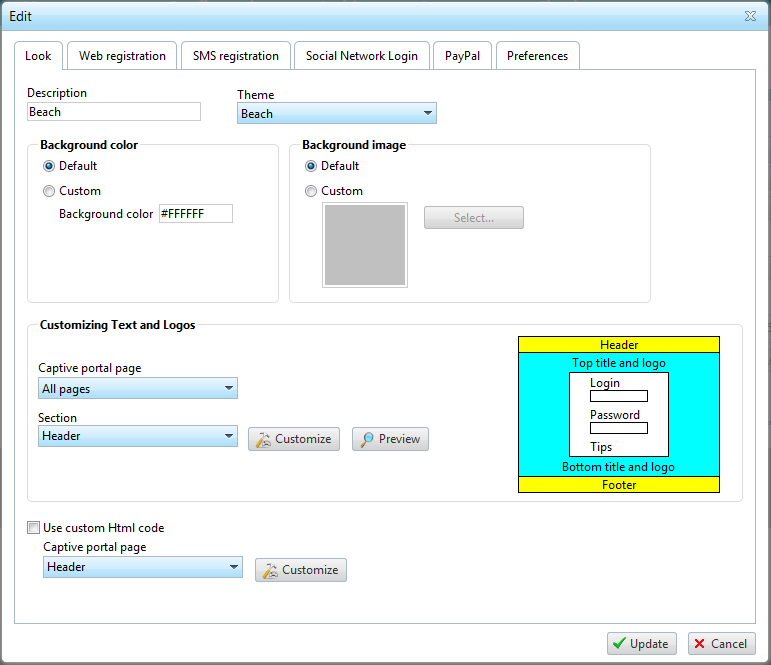
The aspect of the pages displayed to the user at login can be fully customized on both the aesthetic and content levels.
The first available customization concerns the theme to be used: various themes are available. There is a default theme (class), themes for Hotels, camp sites, game rooms, etc. The full list of available themes can be viewed at this address.
Once you select the theme you can continue customizing by changing the theme's default color and background image (if included).
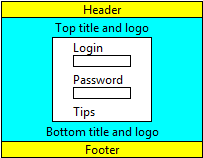
At this point you can further customize the portal by customizing the single elements in the web portal pages. All pages have the following layout:
As can be seen in the previous layout, all pages share the same Header and Footer (yellow) while the other elements may vary from page to page. You can select the element to be customized at the bottom of this window by selecting one of the following items: Header and Footer, Login Page, Control Panel, Top-up page, etc. You can choose whether to customize the Header or Footer in the "All pages" page while you can select the section to be customized in all other pages by choosing from "Top Title and logo", "Bottom Title and logo" and "Tips Text and logo".
Once you've selected the section to be customized, click "Customize" to open a window where you can customize the single section using the following elements:
- Title Text: to specify the text and/or Html code to be displayed in the section. For example, in the Header you can enter the name of the hotspot (i.e.: Hotel "Boston" hotspot) while you can enter text before the box (Top Title) or after the box (Bottom Title) in the login page with information on hotspot rates or business hours, etc. Text must be entered in all program languages (Italian, English, French, Portuguese, Spanish and German).
- Text font: the font used for the previous text can be customized by indicating the font color, size and style.
- Logo : You can display a logo with the title text by indicating a jpeg, gif or png file to be displayed and its size in pixels.
The previous technique of customization allows you to easily modify certain sections of the generic page of the captive portal. For special needs is available an additional level of customization that allows you to edit the entire HTML code of each page of the captive portal.
This configuration mode is reserved to operators with a good knowledge of HTML, CSS, Asp.net. In the bottom of the window you can select the page / section to customize. After clicking on the "customize" it will open a window where you can enter your own HTML code. This code can be entered for one or more languages (the only mandatory language is English). Obviously, any time you can return to the default HTML code using the button "Reset to defaults".
Captive portal functions
Each captive portal displays a certain number of functions that can be customized as you please. Specifically:
- Registration via SMS: lets the user registrarsi tramite sms by filling out the form with his/her personal data and mobile phone number. You can choose which fields should be filled out by the user, which group, rate plan, initial credit or subscription to be assigned and, lastly, customize the text and sender of the message the customer receives on his/her phone.
- Login with Social Network: This mode allows users to connect HotSpot using their account with the Social Network supported (Facebook, Twitter, Google and Linkedin).
Using the options in this window you will be able, among other things, specify a particular plan rate for users who will be using this mode and also set the message/tweet that's to be shown in the diary when the user logs on the HotSpot (see also Facebook Login).
In case of Facebook login, you can also customize the app that user have to install in their Facebook profile in order to login. Indeed, after creating own app it will be enough to insert in this page the related App ID/Secret App. - Anonymous access: by enabling this access,userz can log in without being registered. It will be enough to click on the "Click to access" button and the customer will be able to navigate immediately. With this access mode, the customer is identified exclusively through his mac address.
- Registration via web: this procedure is similar to the previous one, but does not require a mobile phone. In this case the use can also set his/her own user name and password.
- Credit card/PayPal payments: by enabling pagamenti tramite paypal, users can top up their credit or purchase subscriptions directly on the captive portal. The user must enter the PayPal account email address, the type of currency to be used and the percent to be accredited on the customer account when purchasing credit.
- Miscellaneous preferences: in this section of the captive portal you can enable system access via login/password and/or prepaid tickets, request the user accept the conditions of use before navigating, enable navigation method changes during top-up or subscription renewal and enable the use of prepaid top-ups and prepaid tickets respectively.
- Overview
- Features
- Registered users
- Navigation mode
- Prepaid tickets
- Rate plans
- Rates
- Users groups
- Connections monitor
- Locations
- Captive portal
- Themes
- Info Portal Wi-Fi
- Credit cards/PayPal payment
- WISP Capabilities
- Authentication without a browser
- SMS registration
- Facebook Login
- WiFi4EU
- Prepaid recharges
- Sessions archive
- Statistics
- Operators
- Checkout management
- Receipts
- Preferences
- SMS and EMail sending configuration
- Developers API

